Who doesn’t like to make some extra quick money? And binary options trading makes it possible. Through this trading, you can make real money very fast, but too much risk is involved. But if you are nervy enough to take the risk, then binary trading is just the thing for you. You can make loads of profit using this method, but before getting into the profit part, you must first understand the intricacies of trading binary options.
What are binary options?
Binary options are a form of options trading that is based on a single question, “did a stock index commodity or Forex pair end up over a specific price or not by a defined period of the expiration”. There are many definitions of binary options trading present online, but you must understand the term’s meaning rather than just reading the definition.
It can be a little challenging to understand the concept initially, but let me explain this to you in simple words. Trading binary options mean that the trader or investor will have to postulate whether the price of an asset will go up or down after a certain period, and based on his speculation, he gets the money. And the price of assets includes assets such as the stock price of companies, the price of cryptocurrencies, the USD/GBP exchange rate, the price of gold or silver, etc.
The period can be as short as a minute; this means that the trader would have to speculate whether the price of a specific asset would increase or decrease after a minute. Thus, a person can trade binary options hundreds of times per day in global markets.
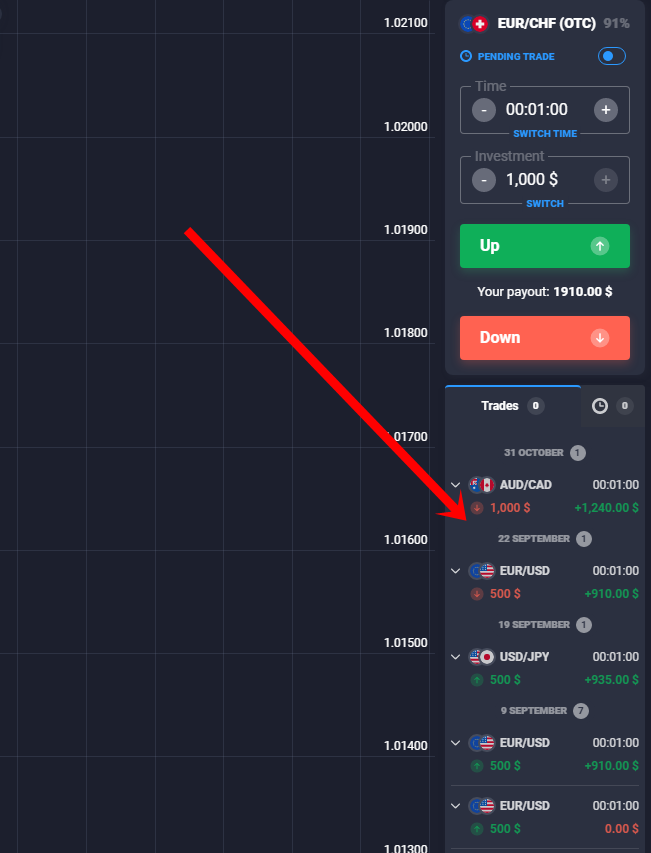
Why you should trade binary options? The main thing that has attracted traders to binary trading is that they predict only precisely how much they can gain and what they will lose. Usually, the profit percentage is 70-95% of what is invested. For example, if you invest $100 and your speculation about the asset price was right, you will get $170-$195. This makes trading simpler. There are only two options at the end of this. Either you gain it all or lose it all. That is why it is called the binary option.
Binary Option types for making money
The most common type of trading in binary option is the Up/Down trade, but there are other types. Let us know about them:
- High/Low or Up/Down
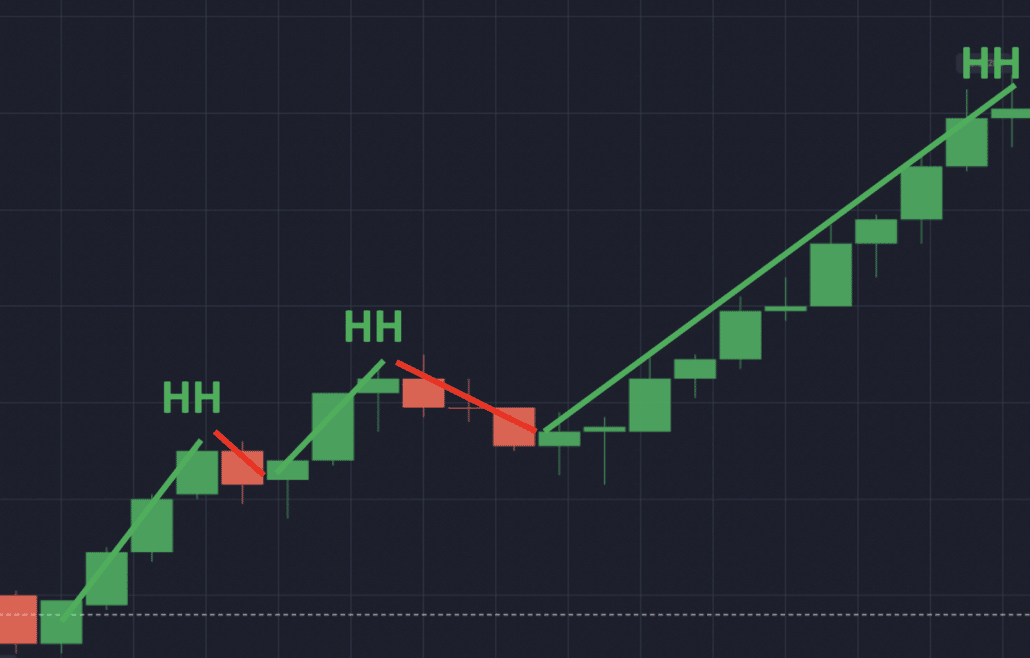
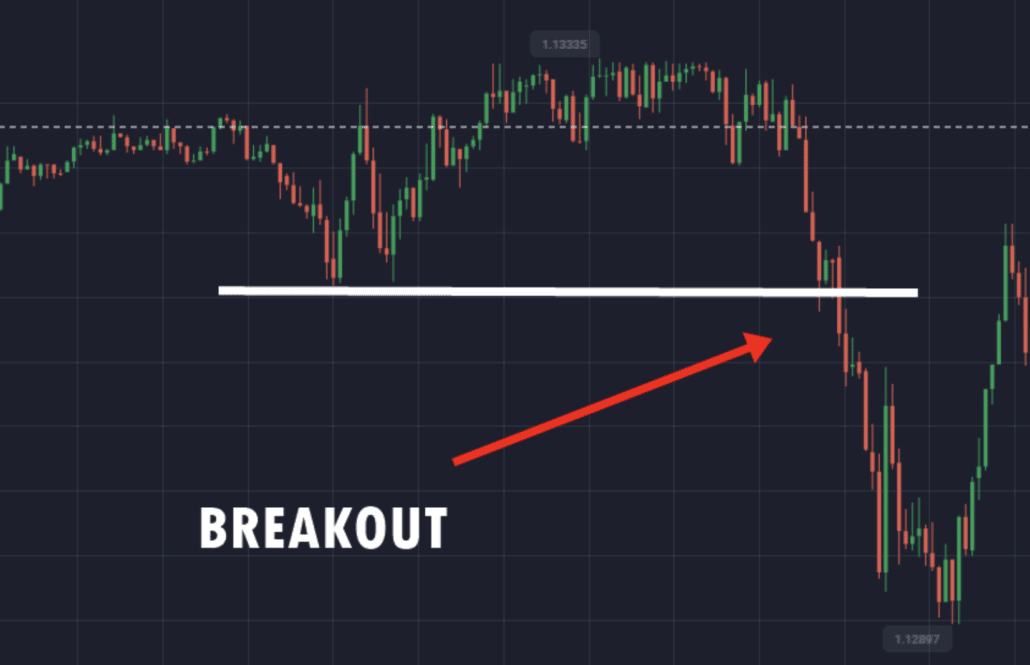
This is the most common type of binary option. In this option, the trader predicts whether the asset price will go higher or lower than the current price of the asset after the expiration time.
- In/Out
In this type of option, traders have to predict whether the price of that asset will be up or remain below the high figure or low figure.
- Touch/No Touch
This is the most exciting category. This category has set levels higher or lower than the current actual price of the asset. Traders have to predict whether the asset’s actual price will touch the level at any point before the expiration time. And if the price touches that point, the trading gets over at that time itself, and the trader gets payout immediately at that time.
- Ladder
This option is very similar to the Up/Down trade, but instead of using the current price of the asset, the ladder uses different price levels.
Factors to consider to get rich with Binary Options
Here are some listed factors from which you will get an idea.

#1 Role of required possibilities
Well, according to recent surveys and reports, the possibilities to get rich seem a little low. Getting rich through this option is a type of qualitative phrase.
As Binary Options strategy totally works on predictions. As said, it’s like a financial bet. But this strategy is widely followed by many crypto traders and entrepreneurs for instant success. But some traders who gained experience in this trading option concluded that it is legit, but it is not really safe. It is difficult to get rich through the Binary Option, but it is typically based on luck like a ‘one in a thousand’ kind of person.
The chances of getting rich and succeeding in this are really very low, but it is not impossible. But that low word seems so low that even the lottery tickets will sound like a better and safer option.
#2 Role of a broker
The toughest task in Binary Options trading is to find the right legit broker with an ideal repute. And finding the best binary broker will increase the chances of profit and fewer chances of errors or any sort of loss.
Always try to consider those binary brokers who offer free demo trials. Due to this, the process will become more flawless and research well for everything like seeing for transparency, professionalism, and services. There is no doubt that Binary trading has many risk factors, and that’s why you should be aware of the brokers claiming strategy.
(Risk warning: Your capital can be at risk)
#3 The role of timeframe
A well-known finance fact based on time is “the longer the investment period, the higher will be the profitable outcome”. And the chances of a profitable result decay significantly as the timeframe of a particular investment trade decreases.
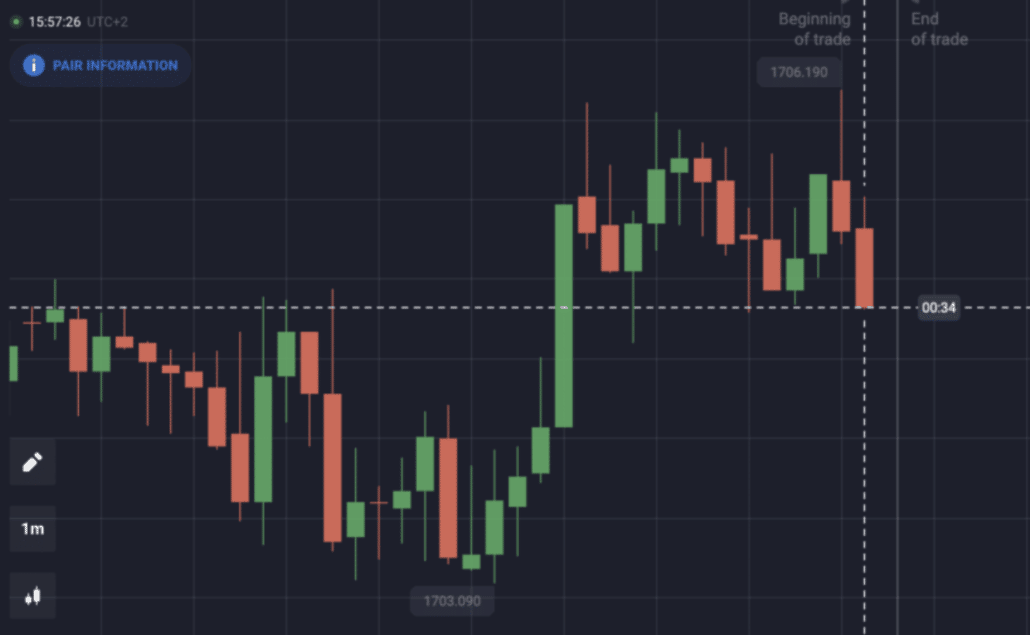
This is another crucial reason why it is hard to get rich in binary trading. Short-term traders invest their 1 minute as well 3,4- hours on the chart. And this one minute provides all the information like entry and exit signals.
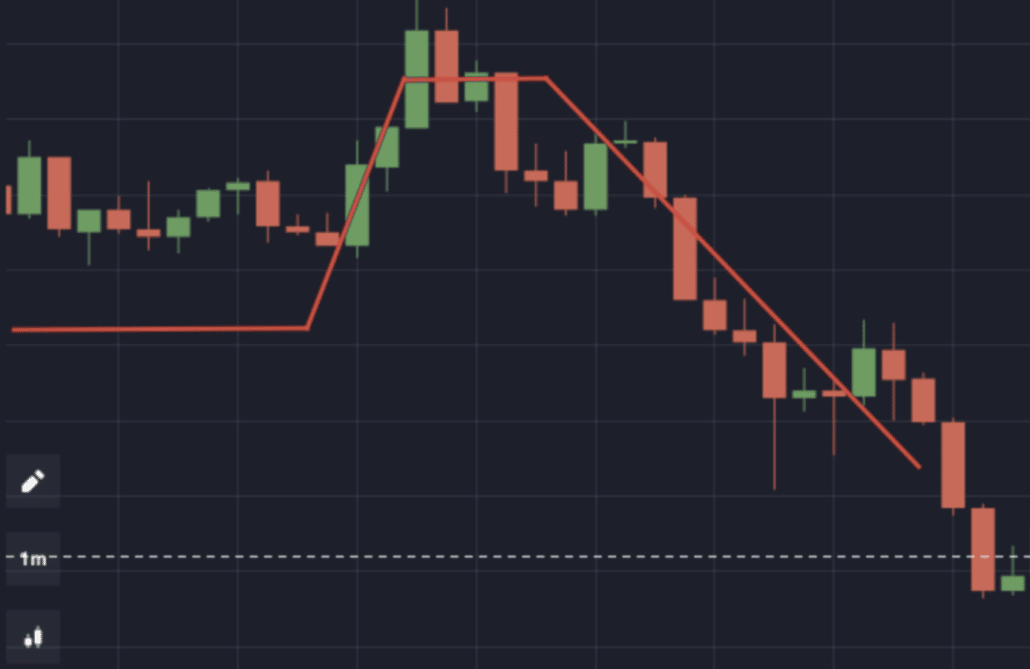
Try to make better time framing strategies for better results, analyze charts and focus on that particular time frame that works best for you. First, make sure your strategies are aligned according to your time frame. And then decide your ‘main’ time framing.
#4 Role of payout
Binary options results or precisely payout is mainly the certain type of expected return that a trader will receive. The standard payout in Binary trading is around 75%-80%, and this percentage depends on brokers. Many brokers also offer about 90% of the payout.
Quotex is a top-listed binary broker that offers the highest payout returns.
The payout ratio plays a very crucial role in this, but it is a very tough game as winning through predicting the future price seems harder.
(Risk warning: Your capital can be at risk)
#5 Role of frauds and scams
Certainly, this tool is not a scam; the frauds for most of the parts are somewhat associated with brokers. Brokers could do that scam basically because most of them do not have much experience and are not real legally. No doubt, it involves betting on financial assets, commodities, shares, and many more. But unfortunately, frauds and scams are all too uncommon.

A report stated that “In all the cases, the problem isn’t with binary trading options, it is with the brokers. Also, a lot of binary options often depend on the trading robots to automate their respective trades. So, try new strategies to avoid the risk of scams and play safe.
Binary Options explained with examples: duration, profit, and losses
Trade duration
The benefit of investing in binary options is you have a number of choices. One of the most extensive choices is time (duration).
The duration most probably ranges a little over 60 seconds. Thus, you will need to check with the broker about the minimum and maximum duration. However, the most common duration is 10-60 minutes.
Profit and losses – How much money can you make?
Consider this question: Will the price of bitcoin be above $39,243 today at 5:00 P.M? If, according to your research, you think that yes it would be, then you should buy the binary option, and if you think the contrary, you should sell your binary option.
The price of binary options ranges between $0- $100. Now imagine that the binary for the above asset is trading at $52.50 (bid) and $55.50(offer).
If you buy and trade bitcoin as a binary option, then you have to pay $55.50, and if you sell, then you’ll sell at $52.50. Now let’s assume that you predict that the price of bitcoin would be above $39,243, and thus, you decide to buy the binary option at $55.50. If now, after 5p.m, the price of bitcoin goes above $39,243, your prediction was correct, and the binary option you bought at $55.5 would become $100. This would make your binary profit $100-$55.5=$44.5.
But if the bitcoin price goes below $39,243, then your option expires at $0, and you lose all the money you had invested. (The price of the binary options given here was excluding the fees, remember that you will have to pay the broker’s fees while doing binary trading.)

At the end of binary trading, every option closes at either $100 or $0. If your prediction is accurate, then your money will become $100, and if it’s false, then you will get $0. This means that the maximum amount you can get from a single binary option is $100. So, imagine the number of $100 you can make in a day if you trade even for five-six hours. To make money through trading binary options is like counting stars. It’s endless. But there is a high risk involved in this kind of trading.
How to trade binary options?
Here is a step-by-step guide for trading binary options:
- Choose the right website
The first thing you need to do is choose the correct broker for trading binary options. You can do this by comparing all the website reviews and choosing the best option for yourself. Try to choose a website that charges minimum fees and gives fast services.
- Pick your asset or market
The asset list for binary trading is enormous, but you should select the area where you have prior experience or have deep knowledge because your money would be at stake. There are many options available in the market for binary trading. These include forex, cryptocurrency, indices, commodity, stocks, etc. For example, the stock price of Google, the price of oil, and Ethereum, all of such assets come under this list.
- Select the size of your trade
You must set a certain amount for trading in binary options because your total investment is at risk, so it is better to start with a small number of binary options. Later you can increase the number of binary options you buy based on the experience you gain.
- Pick your time frame
When you start binary options trading, you will find an option to select the expiry time of the asset, and you can select from intraday, daily, or weekly. Intraday options would be best for day traders who can give the maximum time of their trading, and it is the most profitable option. Intraday traders can do several trades in a single day and earn profits. Daily options expire at the end of the day, which is also beneficial for day traders. Lastly, the k option also expires at the end of the trading week and can be suitable for swing traders.
Best binary options broker available for earning money
100+ Markets
- Min. deposit $10
- $10,000 demo
- Professional platform
- High profit up to 95%
- Fast withdrawals
- Signals
100+ Markets
- Accepts international clients
- High payouts 95%+
- Professional platform
- Fast deposits
- Social Trading
- Free bonuses
100 Markets
- High bonus
- Free gifts
- Accepts international clients
- Userfriendly platform
- Copy trading
100+ Markets
- Min. deposit $10
- $10,000 demo
- Professional platform
- High profit up to 95%
- Fast withdrawals
- Signals
from $10
(Risk warning: Trading is risky)
100+ Markets
- Accepts international clients
- High payouts 95%+
- Professional platform
- Fast deposits
- Social Trading
- Free bonuses
from $50
(Risk warning: Trading is risky)
100 Markets
- High bonus
- Free gifts
- Accepts international clients
- Userfriendly platform
- Copy trading
from $250
(Your capital can be at risk)
On the marketplace, you will find lots of brokers that claim to be trustworthy and give you the best results you need. But we have rounded up the best broker option that not just guides you in the right way but also helps you earn the massive profits you need.
Quotex.io is the new and leading trading platform that launched in 2019, and since then, it has become the best for everyone. Each of its developers put strenuous efforts into making this valuable application for every new and expert broker.
The ultimate goal of the Quotex.io app is to make everything possible for everyone who is willing to fulfill their desires and opportunities. In addition, it is an entirely modern platform that works in 4 easy steps.
The best of Quotex you can start with a demo account if you feel any risk. Also, it has nothing to do with real money. You can use this platform hassle-free and find the profits.
Conclusion: You can make a lot of money with Binary Options, but it is high risk!
Many traders who are new to this concept of trading wonder if they can make money by trading binary options; by now, you must have understood that you can make loads of money using this trading option. Once you become used to the market, you can buy several binary options and multiply your investment by hundreds of dollars in a single day.
But always remember that when you trade binary options, always trade with only that much capital that you can afford to lose, and this is not just for the beginning but keep this in mind for as long as you trade in binary options. Also, we suggest before trying your hands on binary trading; you should take assistance from experts.
(Risk warning: Your capital can be at risk)