A couple of years earlier, people started trading binary options. And today, it has become a popular way of earning money. That’s because this trading works on the simple proposition of yes and no.
Binary options trading is not only easy to execute but also simple to understand. Whether new or professional, any trader can make a huge amount of money simply by speculating on the price movement of an item.

Besides the simplicity of binary options trading, another thing that traders like about it is its short-term trading strategy. With 60 seconds strategy, traders can exit the market in less than a minute with a huge profit.
But what is a 60 seconds binary options strategy? How does it work? What are its benefits and limitations? Well, you can read this guide to find all the answers to these questions and more.
What you will read in this Post
(Risk warning: You capital can be at risk)
What is 60 seconds trading?
Sixty seconds binary options trading is a way of investing in the market that offers fast results. It is excellent for traders who want to make quick money without staying for too long in the market. But this trading is not easy.
Since traders are required to leave the market in less than a minute, they must analyze the market and understand the price movement of the given asset correctly. That’s because even a minor mistake can make them lose huge money.
Sixty seconds trading strategy is also known as a short-term trading strategy. New traders must stay away from this trading technique because the risk of losing money with this trading strategy is more.
If you want to try your luck with 60 seconds trading strategy, you must choose a reliable trading broker. That’s because, in this trading, everything happens so quickly. And if the broker is slow, you might not do real-time trading. Thus, you will lose.
So, once you have become familiar with this trading method and have found an excellent broker, you can try one-minute binary options trading.
(Risk warning: You capital can be at risk)
How does the 60 seconds trading strategy work?
See my full trading video first:

By loading the video, you agree to YouTube’s privacy policy.
Learn more
Sixty seconds trade works in the same way as other binary options trade. Here trader needs to predict whether or not the price of a given asset will move up. Based on the speculations, a trader quickly needs to make a move.
If you want to win a 60 seconds binary options trade, you must have a clear strategy. Additionally, you must make a quick decision. Although this trading strategy requires you to make quick moves, it’s better not to rush to enter every trade. That’s because then you will suffer a significant loss.
Before entering the trade, it’s essential to spot the trend, track the price movement, and analyze the market to understand your chances of winning.
For instance, if there were two down-movements in the price trend in the last two minutes, you can place a put trade. This way, your chances of winning the trade increase. Similarly, you can choose a call trade if there are two or more up-movements. If your trade end “In the Money”, you will get around 70% to 90% returns on what you have invested. However, if your trade is unsuccessful, you will lose the same amount of money.
Best 60 second trading strategy
In addition, check out this video:
By loading the video, you agree to YouTube’s privacy policy.
Learn more
The world of one-minute binary options trading moves very quickly. And to move in the winning direction, you must develop a solid and detailed plan.
There is no best one-minute binary options strategy, but you can get precise details of the trading world using support and resistance. This rule says that the price of an asset always comes back to its original value.
The level of support and resistance is the frame inside a limit where the price of a given asset moves. For every time frame, there are different levels. If the time frame is less, the price of the commodity will go beyond.
Traders can also use a candlestick chart for doing 60 seconds binary options trade. Through a candlestick chart, traders can see the price trend of commodities in a better way.
Once you have found a trading strategy, make sure that you stick to it. No matter how you feel about the trade, if numbers and indicators tell something, do not overlook it. This will help you avoid costly mistakes.
60-Second Binary Options strategies:
Having multiple trading strategies makes sure that decisions are not made emotionally.
Instead, a strategy refers to having a specific calculated course of action that reaps benefits. The desire and fear of losing all of these are common emotions that arise when investing your hard-earned money and having a strategy. Instead, it generates confidence and the ability to take a calculated risk.
When trading binary options, it is even more important to use a strategy. While the software is easy to use, you can still lose a lot of money if you make poor decisions or choose the wrong trades.
Check out one of my 60 second trading session with strategy:
By loading the video, you agree to YouTube’s privacy policy.
Learn more
1. Support and resistance strategy
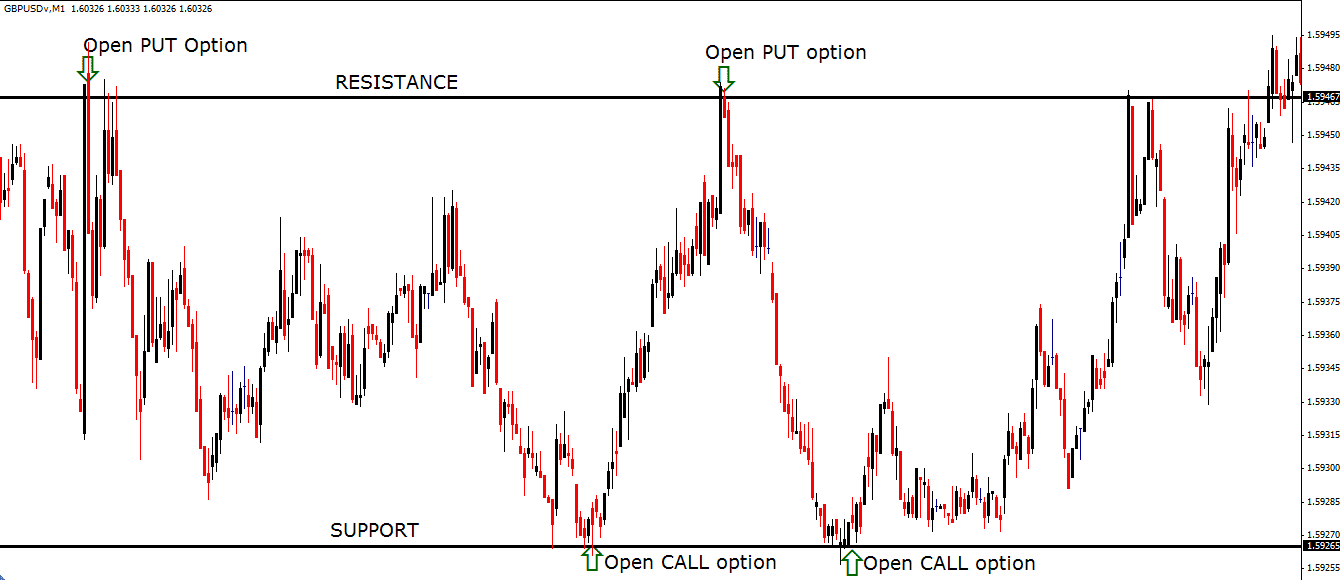
The price of assets possesses a tendency to advance in a sequence of waves with each one possessing a top and a bottom. These constraints are assessed to be major reversal levels which can be readily identified by key support and resistance levels. A favorite 60 seconds strategy is to identify those times when the price clearly rebounds against these resistance and support levels. New binary options should then be opened in the opposite direction to that in which the price was progressing before the rebound.
For instance, the next GBP/USD 60 seconds trading chart presents good examples of when to execute both CALL and PUT binary options. Essentially, whenever the price rebounds against resistance, you should activate a PUT option. Similarly, if the price bounces higher after striking support, then you should open a CALL binary option.
Your first step in instigating such a binary options strategy is to detect a currency pair that has been range-trading for some extensive time. You must then identify the resistance and support levels by either using your broker’s information or simply connecting the highest points for resistance and the lowest values for supports, as shown on the chart above.
Once you observe price testing one of these levels, then wait until the present candlestick confirms a true bounce by cleanly closing below resistance or above support. This action will provide you with some protection against false signals. For example, if a successful confirmation is attained, then open a new PUT binary option using the GBP/USD as its underlying asset with a 1-minute expiry time if the price bounds against resistance, as displayed on the chart above.
By wagering $100 with a payout of 75%, you would have collected $75 for both the PUT options shown above. In fact, your initial wager of $100 would have exponentially increased to $937 for the four trades displayed above within 5 hours if you had reinvested your returns in each case.
2. Follow the trend strategy
Another 60 seconds strategy that has gained in popularity recently is based on tracking trends. This is because such strategies allow you to exploit the advantage of trading with the trend and, as such, comply with the famous maxim which states that the ‘trend is your friend’. The basic idea is to trail a trend and execute a ‘CALL’ binary option if the price ricochets higher from the lower trendline when the underlying security is climbing within a well-established bullish passage. In contrast, you should activate PUT binary options whenever the price rebounds downwards after hitting the upper trendline in a well-defined bearish channel.
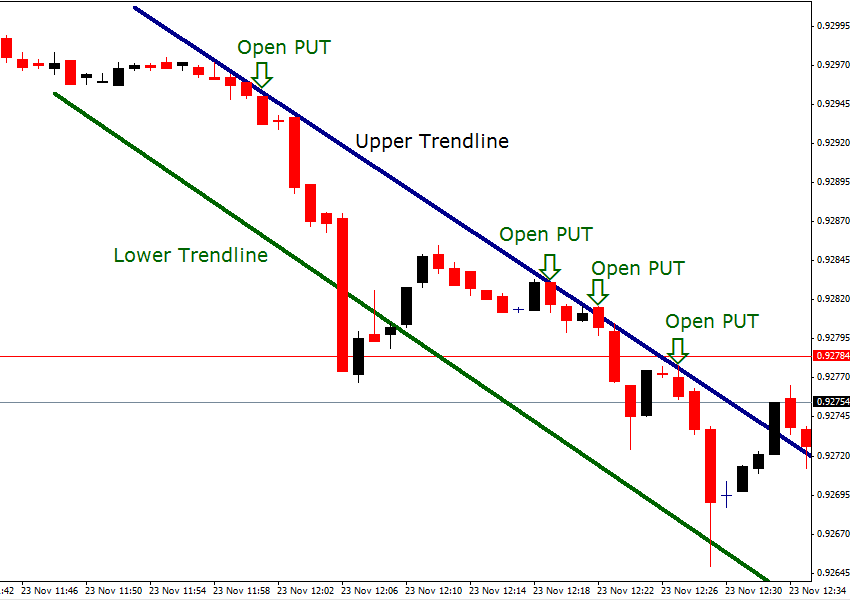
For example, the above 1-minute trading chart for the USDCHF currency pair clearly displays a strong bearish trend. As you can confirm from studying this diagram, four opportunities for opening PUT options arose after the price rebounded lower against the upper trendline.
To instigate a trending strategy, you must first locate an asset that has been trading in either a bullish or bearish trend for some time. You then need to draw the trendlines by connecting the series of lower highs for the upper trendline and the lower lows for the lower trendline in the case of a bearish channel, as illustrated in the above chart.
Once you observe price testing the upper trendline, then you should pause until the current candlestick completely forms so that you can verify that it closes beneath this level. If it does, then initiate a new PUT option using the USD/CHF as its underlying asset with the 1-minute expiry time. Envisage that your wager is $5,000 and the payout ratio is 75%. The four successful trades identified on the above chart would have netted you a staggering $46,890 in just over 2 hours if you reinvested your profits each time. Now, you can begin to understand why so many traders are raving about 60-second binary options.
3. Breakout Strategy
A favorite 60 seconds strategy is trading breakouts since they are easy to detect and can generate impressive returns. The key idea of this method is that if the price of an asset has been oscillating for some extensive time within a restricted range, then when it does attain enough momentum to break out, it frequently travels in its chosen direction for some considerable time.
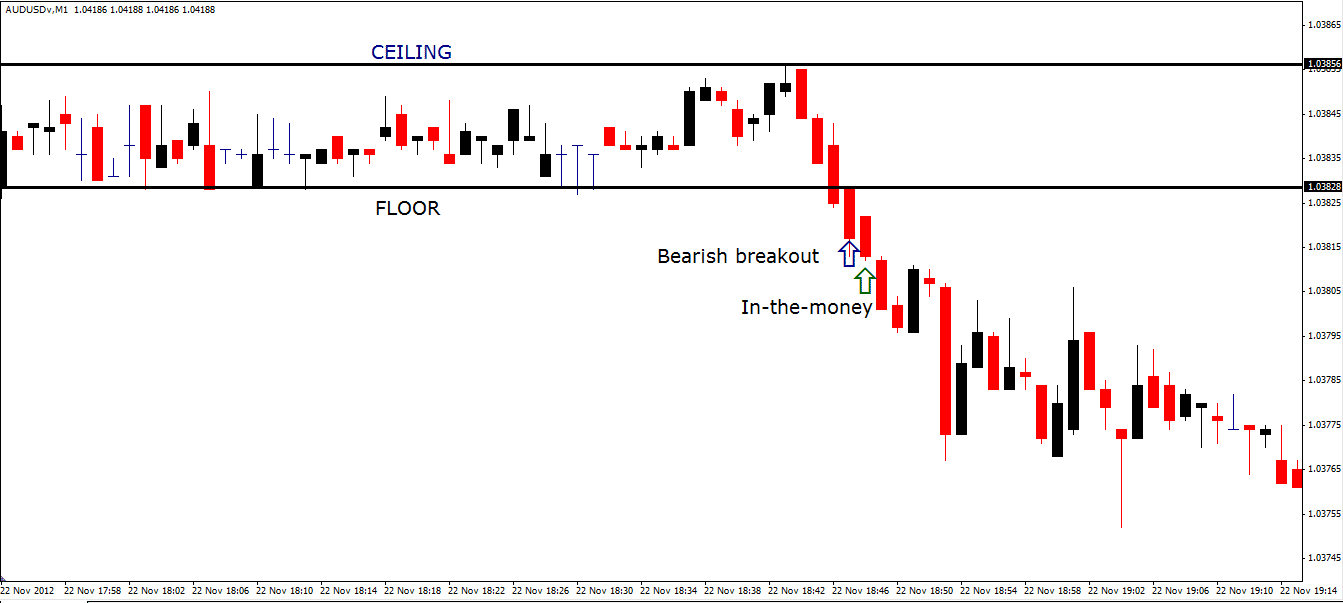
Your initial step in implementing this technique is to identify an asset pair that has been fluctuating within a confined range for an extensive time period. As such, you are searching for a side-way trading pattern that is clearly delineated by a bottom and top, as demonstrated on the above AUD/USD 60 seconds charting diagram. Very often, the price will bounce against its floor and ceiling numerous times before finally breaking free, as illustrated again in the above figure. A sustained breakout should subsequently be assessed as a strong recommendation to initiate a new trade.
As the diagram above shows, the price does attain a clear breakout beneath its support or floor. You are now recommended to wait until the current 60 seconds candlestick is fully formed so that you can confirm that its closing value is undeniably below the bottom level of the previous trading range. This verification will provide you with some protection against a false signal.
After accomplishing this objective, you should now open a new ‘PUT’ binary option based on the AUD/USD with a 60 seconds expiry period. As this form of trading is definitely dynamic, do not risk in excess of 2% of your equity per position. If your equity is $10,000, then your bet should be just $200. Your opening price is 1.0385; your payout ratio is 80% and your refund is 5%. After the one-minute expiry time elapses, the AUDUSD stands at 1.0375; you are “in-the-money” and collect $160.
60 Seconds Binary Options with indicators:
Here are a few popular binary options indicators that you can use for 60-second binary options trading.
1. Relative strength index
Out of all the available indicators, RSI (Relative Strength Index) is the most trusted one for 60 seconds binary options trading. Using this instrument, a trader can make a winning trade within one minute.
This instrument of technical analysis shows every possible change of trend in the market. RSI has two different fields, i.e., overbought and oversold, on which the complete technical analysis is based.
In the RSI, if the curve chart leaves the oversold field in the bottom-up direction, that means you can trade for the purchase, i.e., call. Similarly, if the curve leaves the overbought zone, you can trade for falling, i.e., put.
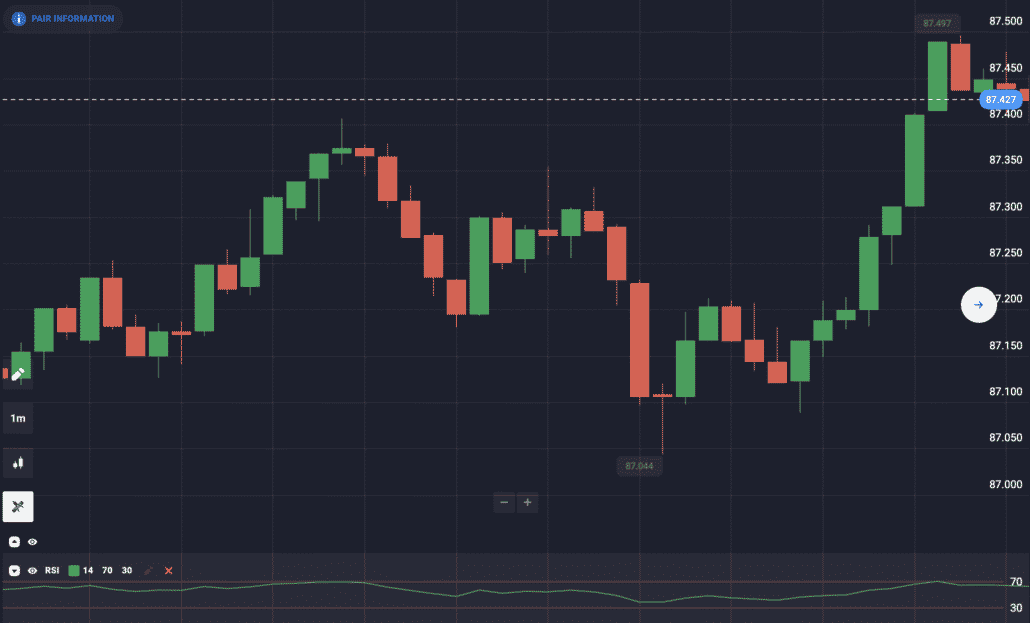
To increase your chances of winning, you can use the following settings. Chart period- 10 seconds, RSI setting- 18, overbought- 70%, oversold- 30%, and option period- 1 minute.
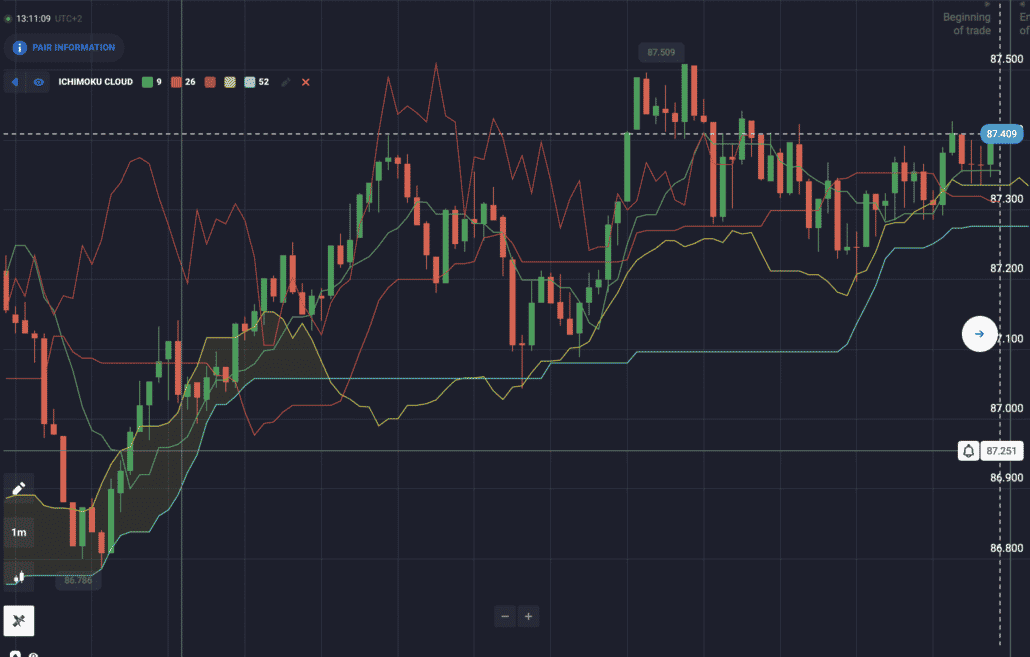
2. Ichimoku
Besides RSI, another popular indicator used for 60 seconds binary options trading is Ichimoku. This indicator is seen in terms of clouds. If the indicator curve comes out of the cloud in the bottom-up direction twice, traders can buy the put option.
If the opposite of this situation happens, traders can buy the call option. If the price continues to move in the same direction, traders will make a significant profit.
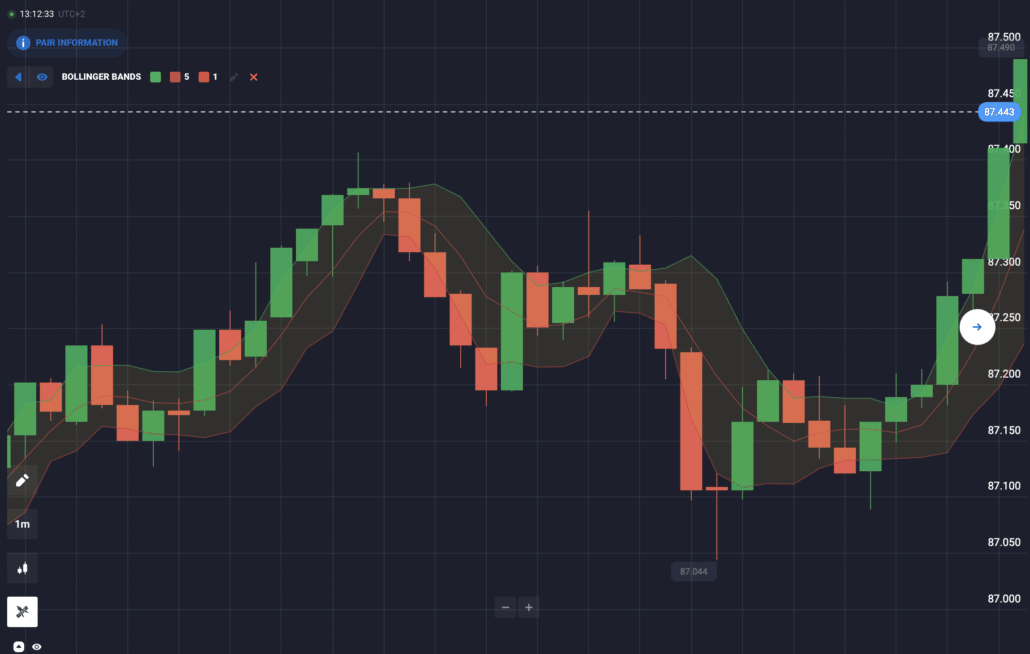
3. Bollinger Bands Indicator
The next indicator that traders can use for 60 seconds binary options trading is the Bollinger Brands Indicator. This indicator helps the trader to mark a break while the price of an asset is moving.
60 seconds binary options without indicators:
While some traders prefer indicators for doing 60 second binary options trading, some strategies do not need indicators. If you want to trade without using any indicators, you must analyze the market properly through trading charts.
Important aspect of 60 seconds Binary Options trading
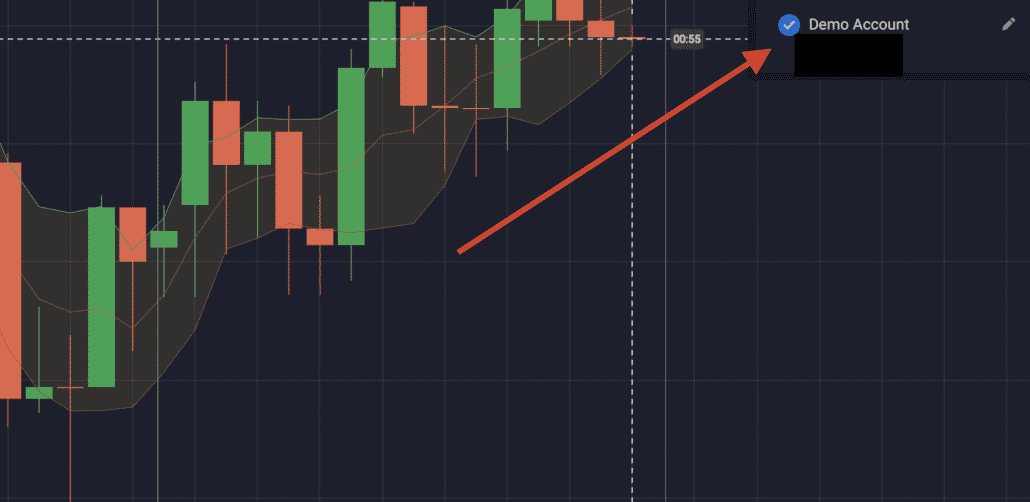
Before you start trading, it’s essential to select a broker and register yourself with it. Right after registering, it’s not wise to trade using real money. You can use dummy money to get an understanding of the 60 seconds trading.
Trading in the demo account will help you know how reliable the platform and its interface are. Additionally, it’s not recommended to trade 60 seconds binary options for more than 2% of the amount that you have in your broker’s account.
Brokers with 60 Seconds Binary Options offers:
It’s necessary to trade with a reliable broker to make a profit from 60 seconds binary options trading. Here are some trustworthy binary options brokers to choose from.
100+ Markets
- Min. deposit $10
- $10,000 demo
- Professional platform
- High profit up to 95%
- Fast withdrawals
- Signals
100+ Markets
- Accepts international clients
- High payouts 95%+
- Professional platform
- Fast deposits
- Social Trading
- Free bonuses
100 Markets
- Accepts international clients
- 24/7 support
- Binary & CFDs
- High returns
- Free bonus
- TradingView charts
100+ Markets
- Min. deposit $10
- $10,000 demo
- Professional platform
- High profit up to 95%
- Fast withdrawals
- Signals
from $10
(Risk warning: Trading is risky)
100+ Markets
- Accepts international clients
- High payouts 95%+
- Professional platform
- Fast deposits
- Social Trading
- Free bonuses
from $50
(Risk warning: Trading is risky)
100 Markets
- Accepts international clients
- 24/7 support
- Binary & CFDs
- High returns
- Free bonus
- TradingView charts
from $250
(Your capital can be at risk)
1. Quotex
Quotex is a great binary options broker known for its amazing trading services. Traders can sign up with Quotex without any hassle. This binary options broker is great for placing binary options trades because it allows traders to access many underlying assets.
| Good to know! |
| The reach of Quotex about the underlying trading markets is great. This 60 seconds binary options broker allows traders to get the most out of trading. Besides, this platform also has several trading tools that traders can use to conduct technical analysis. |
The 60 seconds binary options trade becomes fun on Quotex for the following reasons:
- Placing 60-second binary options trade on this platform is easy for any trader.
- A trader can choose any payment method to fund his trading account with Quotex to place trades.
- Traders can also enjoy the benefits of accessing trading indicators to conduct technical analysis before placing the trade.
- This 60 seconds binary options broker allows traders to use the Quotex demo account. A trader can use the demo trading account to learn how to trade 60-second binary options. Besides, they also learn how to manage their funds and the art of risk management.
- Apart from this, Quotex also ensures that traders get a lot of research and educational material, which further helps them trade 60 seconds binary options with profits.
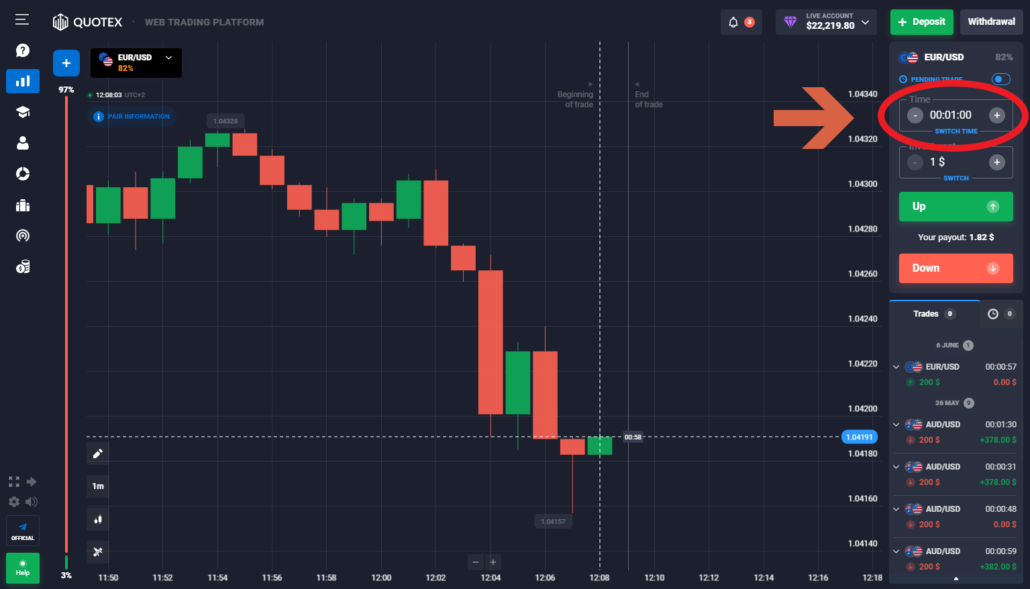
So, any trader can enjoy making money within minutes with the help of this 60 seconds binary options broker. Besides, traders can also enjoy trading on the Quotex app. So, from every perspective, Quotex is the best broker any trader could desire.
(Risk warning: You capital can be at risk)
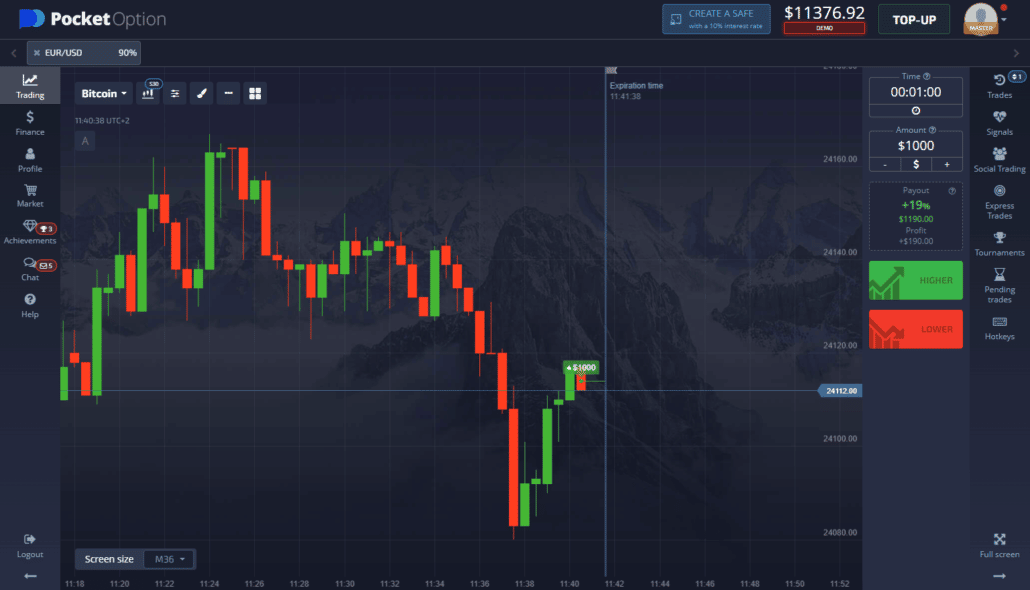
2. Pocket Option
Another great 60 seconds binary options broker is Pocket Option. Pocket Option makes any form of trading easy and fun for traders. Whether the 60-second binary options trade or the 5-minute, a trader can place it without hassle.
| Good to know! |
| Pocket Option is known for its reliable services. If you are beginning binary options trading, you can initiate with Pocket Option. Even if you wish to place 60 seconds binary options trade, you can sign up for a trading account with a minimum deposit of only $50. |
Some features that make Pocket Option a great 60 seconds binary options broker are as follows:
- Traders can find many underlying assets on Pocket Option, just like on Quotex.
- This 60 seconds binary options broker allows traders to access several trading platforms. So, you can make 60 seconds binary options trade even more fun by choosing a platform based on your expertise.
- Traders have many trading indicators, such as Bollinger Bands, MACD, etc., at their disposal. They can use these trading indicators and other instruments to smooth their trading experience.
- Traders might also find several educational videos, etc., on Pocket Option.
- The platform also offers the Pocket Option demo account, which is available for use to a trader for 30 days.
(Risk warning: You capital can be at risk)
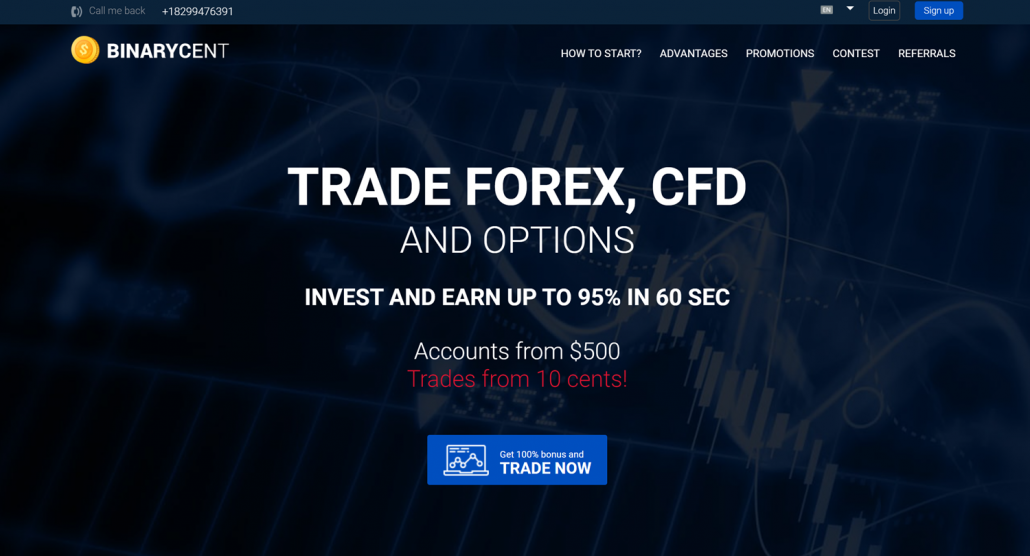
3. BinaryCent
This 60 seconds binary options broker is great for traders who wish to open and close their traders within a minute. BinaryCent allows traders to witness the best of all the fastest ways to enjoy trading 60-second options. With this 60 seconds binary options broker, you can make money easily and quickly.
| Good to know! |
| BinaryCent offers traders a trustworthy and intuitive online trading platform. You can also enjoy trading by beginning with a small minimum deposit amount. In addition, the trading platform offers plenty of stocks, commodities, etc., to traders. Thus, BinaryCent is a great trading platform if you want to diversify your trades. |
Here are some features of BinaryCent as a great 60 seconds binary options broker:
- BinaryCent is a great binary options trading platform from a feature perspective. It has all the features a trader would love to have on their platforms.
- All leading technical tools and indicators are available with BinaryCent. Thus, traders don’t experience hassle trading binary options with this 60 seconds binary options broker.
- Trading binary options with BinaryCent is appealing to traders because they can enjoy using all the top-notch trading tools.
- BinaryCent does offer traders a demo account. You can practice opening and closing 60-second binary options trades.
- Besides, like other trading platforms, BinaryCent allows traders to access the leading educational resources.
So, binary options trading is fun for traders if they know the right tactics. In addition, things become even better when a trader has a trading account with a reputed broker.
Thus, if a trader is keen on making money by trading 60 seconds binary options trade, he can choose one of these three binary options brokers.
(Risk warning: Your capital can be at risk)
Who should implement 60 seconds Binary Options Strategy?

Make sure you are one of these traders to avoid losing money while trading 60 second binary options.
- Small-Term Traders: If you are a short-term gainer who doesn’t want to stay in the market for a long time, then 60 seconds trading strategy is perfect for you.
- High-Volatile Asset Trader: If you like trading high-volatile assets like cryptocurrencies, you can take the help of 60 seconds trading strategy. But if you are not familiar with the asset, you must think twice before making a move.
- Act on Small Market Movement: If your trading moves depend on small market movements, you can use 60 seconds binary options trading. That’s because minor ups and downs in the market can help you win huge money.
- High-Frequency Traders: If you trade multiple times a day, you can use 60 seconds binary options trading strategy to exit the market quickly.
Who should avoid 60 seconds trading strategy? – Advantages & disadvantages
Although 60 seconds trading strategy is getting popular, it’s not for every trader. If you are one of the following traders, you must not use 60 seconds binary options trading.
- New Traders: If you are new to the binary options trading world, you should avoid using 60 seconds trading strategy. That’s because you might not have a deep understanding of the market. And without proper knowledge, you will lose.
- Long-Term Traders: If you are a long-term trader, 60 seconds of trading is not for you. With this trading strategy, you can only make small profits.
- Interested in Higher Payouts: If you are interested in higher payouts, you should try investing in long-term trades rather than 60 seconds binary options trades. That’s because the payout rate of small-term trades is 10% to 20% less than long-term trades.
- Trading Depends on Trading Signal: If you follow any trading signal, you should avoid trading 60 seconds binary options.
Advantages of 60 seconds trading strategy
- You can trade multiple times in a day.
- You get different assets to trade.
- Sixty seconds binary options trading strategy offers a better trading experience.
- You can make the most out of small market movements.
Disadvantages of 60 seconds trading strategy
- A significant drawback of 60 seconds trading strategy is that it is risky.
- It’s tough to speculate the accurate price movement of assets.
- Over-trading can make you lose a massive amount of money.
Use ratio-based money management
A ratio-based method determines how much percentage of the money you should invest regarding how much money you have. Having the ratio-based method of money control is a smart decision and a good source of action when starting.
This method is slightly less dangerous as it sees how much one should add to a trade based on how much money is available in your account.
When applying this strategy, you must first think about and decide on a ratio of the funds you’re prepared to put in danger. Generally, traders decide about 1% or 2%; however, with experience, professional traders sometimes choose to risk 5% of their capital.
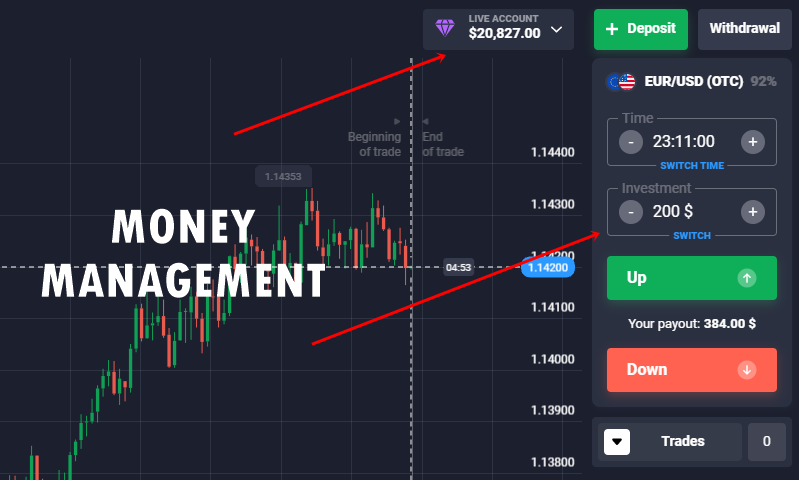
If you lose money, you will always have the option to invest in the next transaction because you will have less money in your account.
But it also means that you always have money in your account and can choose a higher share of capital after each successful transaction. This percentage-based method helps ensure that you are making profits consistently.
Trading advice for Binary Options Trade for 60 Seconds
- Only take on the risk you can afford to take on; generally speaking, you shouldn’t risk more than 1% of your capital in a single trade.
- Choose the correct broker; not all brokers provide the ability to trade binary options. Make use of demo accounts when available and conduct thorough research.
- Use the free tools at your disposal, such as signals. Signals serve as market catalysts and can be excellent predictors of price changes.
- Refrain from trading excessively; it is all too easy to lose control. Why not aim for $5,000 if you can earn $3,000 per hour, you might ask? Wrong. It takes time to build a good setup.
- Exercise patience, have faith in your plan, and maintain composure under pressure.
Rewards of One-Minute Binary Options
The ability to win rapidly is the short trading window’s main benefit. In essence, you can profit from every price change. However, the shorter window also has a higher risk. Therefore rewards are higher compared to, say, a day-long window.
Additionally, you are permitted to execute many deals at once. Finally, 60-second binary options offer a simple win-or-lose premise, making them very simple assets to understand.
(Risk warning: You capital can be at risk)
Risks of one-minute binary options
The dangers should not be disregarded, though. Compared to investing in stocks, foreign exchange, or commodities, binary options trading can be riskier. An atmosphere of high pressure is also produced by the smaller window. As a result, a series of important decisions must be taken quickly.
The 60-second window is probably not the best spot to begin trading or using binary options contracts for people who are new to both. A longer period gives you more opportunities to identify your mistake and, most importantly, correct it. It is far more difficult to recover from if you are trading in the shorter window and make a string of errors. Therefore, it’s important to learn how to trade this particular window. Think twice before attempting to use your standard approach in this particular context.
Furthermore, traders need to be aware that not all brokers provide binary options trading. Therefore, whether you are headquartered in the USA, the UK, or somewhere else entirely, make careful to confirm that they are legal where you wish to trade.
Importance of the execution speed for 1 minute trading
Execution speed refers to the short period between opening order with the broker and getting a revert from the other end.
The execution speed is represented in milliseconds. The value varies from platform to platform depending upon the quality of the trading platform and the number of liquidity servers of the brokers.
It would help if you had the ‘ping‘ to check the execution speed of your brokers like -Quotex, Pocket Option, and Binarycent.
Here is an article to verify the ‘ping’ of the respective brokers.
Conclusion: 60 seconds trading is a great strategy
Sixty seconds binary options trading strategy is an excellent way of earning huge profits in less than a minute. But it is essential to analyze the market correctly to increase your chances of winning using this trading strategy.
To stay away from loss, you can develop a detailed strategy. Moreover, you should avoid over-trading.
(Risk warning: Your capital can be at risk)
FAQs – Frequently asked questions about 60 second trading:
What is the quickest way to earn profit with binary options trading?
The quickest way to earn profits while trading binary options is by placing 60-second trades. A trader who places 60-second trades can instantly increase his bank account balance as he can trade every minute.
How can a trader trade 60-second binary options?
A trader can trade 60-second binary options by choosing a broker, selecting an underlying asset, and placing his trades.
Which broker should a trader signup with to trade 60-second binary options?
A trader can sign up with Quotex, Pocket Option, or BinaryCent to place 60-second trades.
How successful are 60 Seconds Binary Options traders?
That one proclaims binary options trading considers it as a high prize. Often it is workable to receive a good ROI. This high average return makes this type of trading attractive to many experts and beginners.
Can I expand a 60 Second trade?
The answer is No. As the name suggests, the whole idea behind the 60-second trade is that you only have one minute to make a profit or a loss. Therefore, it is very doubtful to find any Brokers who will tell you to increase the expiry duration on a 60 Second trade because these trades are organized that way.
So if you want to get lots of long-term deals, you can always opt for lots of long-term deals.
Can I test out 60-second trades?
Making some demo trades with imaginary money would be great fun when you consider trading 60-second binary options for the first time instead of immediately placing them in a real money trading environment. So here’s how you can try it and not lose real money as well.