
Being a Batswana and looking for the finest binary options trading site can be challenging. We selected those in particular who permit trading with various binary option trading techniques and allow Botswana binary options traders to participate. We’ve got you covered, so don’t worry!
Generally speaking, there are a lot of reliable binary options brokers available worldwide. With so many choices, maintaining an overview is challenging. As a result, we have selected the top ones for you. So let’s learn more about Botswana’s top binary options brokers.
A step-by-step guide to trading Binary Option in Botswana
These web-based brokers concentrate on binary options. On a computer platform and a smartphone app, traders can also speculatively trade in currencies, equities, indices, cryptocurrencies, and commodities.
#1 Pick an available Binary Options Broker in Botswana
100+ Markets
- Min. deposit $10
- $10,000 demo
- Professional platform
- High profit up to 95%
- Fast withdrawals
- Signals
100+ Markets
- Accepts international clients
- High payouts 95%+
- Professional platform
- Fast deposits
- Social Trading
- Free bonuses

250+ Markets
- Crypto options
- Multiple payment methods
- High profit up to 88%+
- User-friendly interface
- Personal support
- Fast registration
100+ Markets
- Min. deposit $10
- $10,000 demo
- Professional platform
- High profit up to 95%
- Fast withdrawals
- Signals
from $10
(Risk warning: Trading is risky)
100+ Markets
- Accepts international clients
- High payouts 95%+
- Professional platform
- Fast deposits
- Social Trading
- Free bonuses
from $50
(Risk warning: Trading is risky)
250+ Markets
- Crypto options
- Multiple payment methods
- High profit up to 88%+
- User-friendly interface
- Personal support
- Fast registration
from $ 10
(Risk warning: Your capital can be at risk)
The top binary options trading websites that permit Batswana traders to handle digital options and binary options are listed below.
1. Quotex

An advanced interactive options broker called Quotex offers trading in nearly 100 markets. The platform was established in 2020, and the owner, Maxbit LLC, is in charge of running it from the company’s headquarters in St. Vincent and the Grenadines. It is a standard offshore broker that welcomes all kinds of customers. The markets provide a substantial profit of close to 95% for trading.
A recently invented trading platform and tools are presented by the online broker. Both desktop and mobile platforms are supported by the platform. The business operates in over 20 nations and provides service in several languages. Market customers and investors have access to good deals on the Quotex platform.
(Risk Warning: Your capital can be at risk.)
2. Pocket Option

It is a global binary options broker. There are binary options marketplaces where you can wager on growing or declining markets with a potential of a large payout. Gembell Limited is the owner of the Marshal Islands-based broker Pocket Option. The broker has a business license, and the IFMRRC oversees the broker.
The Pocket Option website appears to be quite pleasant and well-organized at first glance. You can immediately observe what they are providing for their traders. With a good yield, you can invest in more than 100 separate assets like Binary Options. In a few seconds, a new account can be created. They also provide a free sample account so that you may test the platform.
(Risk Warning: Your capital can be at risk.)
3. Focus Option

There is no need to download any software because Focus Option provides a user-friendly browser-based trading platform. The predicted payment is prominently displayed on the top of the terminal, and a traders’ sentiment indicator is present in the bottom-left corner to assist users in determining the state of the market.
The stochastic indicator, average true range, and pivot points are a few technical indicators that can be superimposed on price charts. There are numerous charting options available, including line graphs and Japanese candlesticks.
Users also gain access to the most recent financial news, such as central bank rates and reports from important financial firms. Clients only need to enter their stake amount, the expiration time, and whether they want to go high or low to execute a trade.
This means that before taking a position, clients are aware of their potential profit or loss. It should be noted that traders can call the support hotline to place trades if they have a bad network connection and, therefore, can access their internet browser.
(Risk Warning: Your capital can be at risk.)
#2 Sign up for a trading account

You must first register with a licensed binary options broker to trade binary options in Botswana. Finding a trustworthy broker who is registered and licensed with the authorities is the first step. Once you have located a broker, you must fill out the online registration form by entering your personal data. Additionally, you will need to select your trading parameters and fund your account.
(Risk Warning: Your capital can be at risk.)
#3 Use a demo account

Trading platforms offer demo and live accounts. You can register for any of them and start trading. But if you are not aware of the trading process or need practice, start trading using a demo account. However, if you are well-versed in trading, then you can go for a live account for binary options after understanding how options function.
#4 Pick an asset to trade

Choose an asset for trading your binary options. This step is as important as deciding the direction of trade. A fast-moving asset can give better gains than a slow-moving one.
#5 Make an analysis

Analyze the asset based on the current market trends deeply as well as its previous performance for more support to your analysis. The tools in the trading platform can also help in this aspect. Make a decision based on the result you get.
(Risk Warning: Your capital can be at risk.)
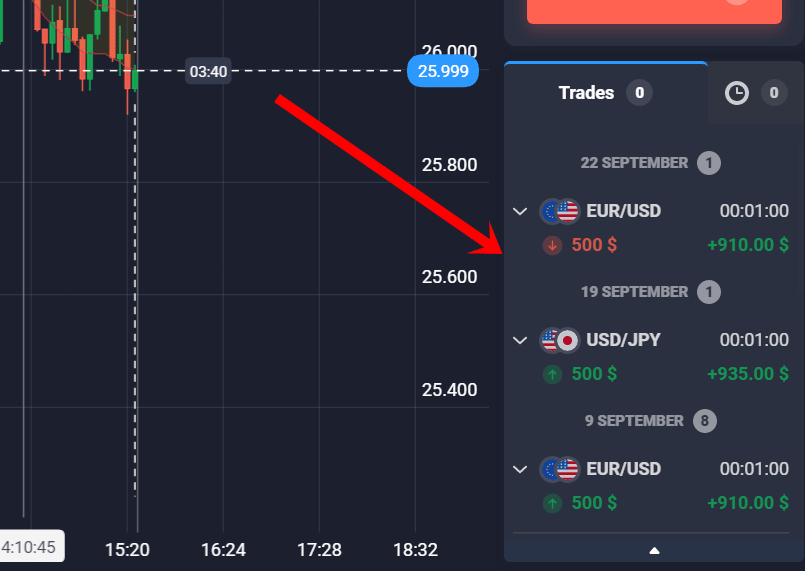
#6 Place the trade

Execute the trade from the trading platform and keep an eye on its movement. While there will be few fluctuations in your position, you need to make a correct decision depending on your analysis.
#7 Wait for the result
The market might go up and down, as already mentioned, but still, if you know when to wait and when to exit a trade, you will make better profits. When you make a thorough analysis and are confident in your research, it is always better to wait.
(Risk Warning: Your capital can be at risk.)
What is a Binary Option?

As derivative securities, binary options derive their underlying asset. This asset could be anything, including a stock, a commodity, a pair of currencies, or perhaps an index. The main distinction between options trading and other derivatives is that when trading binary options, investors only need to consider the size of the price movement of the underlying asset, not its direction. As a result, they are considerably simpler to deal with than other derivatives. Binary options come in two varieties: call and put options.
Is Binary trading legal in Botswana?
The popularity of trading binary options has been rising all around the world. Although it is permitted in some nations, it is prohibited in others. Therefore, the question on everyone’s mind is whether or not binary options are permitted in Botswana.
Yes, Botswana has legalized binary options. The Central Bank of Botswana, which oversees the sector, has implemented several regulations to safeguard investors, including the demands that authorized brokers offer a % return on investment, provide trading education, and disclose any relevant risks. Brokers of binary options must also adhere to anti-money laundering laws and be licensed by the Financial Intelligence Agency (FIA).
(Risk Warning: Your capital can be at risk.)
Payment methods for traders in Botswana
A comparatively new and exciting technique to earn money from home is through binary options trading. The next step involves making a deposit and beginning trading after you have decided on a trustworthy binary options broker and set up an account with them. Each broker will have their own preferred mode of payment; however, the majority will take bank wires, cards, crypto, and digital wallets.
Digital wallets
Customers can simply make binary options payments or withdrawals using their e-wallets after realizing decent returns on their investments.
Bank Transfer
The most reliable way of the transaction is this one. When a bank transfer option is available, you can use those data to initiate a direct transfer using that method.
Card transactions
It is the simplest way to transfer money while not being the safest. The majority of individuals feel most at ease making purchases with cards. This option makes it convenient to deposit money right away.
Cryptocurrency
Even this is a good choice for customers who own cryptocurrencies to use, given the rising number of cryptocurrency holders.
How to deposit and withdrawal
The most common way to finance a binary options brokerage account is using a credit/debit card. This is because it takes little time to complete, and you can generally begin trading right away.
Deposit
You have a variety of ways to fund your live brokerage account. You can deposit using Bitcoin or Tether, as well as MasterCard and VISA debit/credit cards. These all allow for immediate deposits.
Boleto Bancario, PIX, TED, and LATAM are other accepted deposit options with processing times of one to three days each.
Withdrawal
When you wish to withdraw funds from the binary options account, the procedure is rather straightforward. Your broker will wire money to your account after receiving the necessary banking information from you. The complete procedure normally just takes a few days.
However, whenever you make a withdrawal, you should have the following in mind:
- You’ll probably be charged a withdrawal fee by your broker.
- To withdraw money, you may be required to keep a certain minimum amount in your account.
- Based on the broker you choose; you could have to pay taxes on your withdrawal.
Pros and cons of Binary Options trading in Botswana
The pros and cons of binary options trading are listed below.
The Pros of Binary Trading are:
- For a few hundred dollars, you may open binary options account with the majority of websites. For many traders who trade on the side and do not want to invest a lot of money, this is ideal.
- A cheap way to trade numerous underlying instruments.
- Quick returns are a benefit of trading binary options.
The Cons of Binary Trading are:
- Because of simple trading tools, trading professionals think they have all the knowledge necessary to turn a profit in a matter of minutes, but this is not always the case.
- There aren’t many dodgy web brokers who con customers out of valuable money.
Risks of Binary Options Trading in Botswana
If you predict the right price movement, binary options guarantee quick, significant gains. The truth is that you will lose all of your money if somehow the market doesn’t move the way you predicted.
The “all or nothing” payment structure, wherein one of the two results for a binary option contract’s two possible outcomes is that the retail client will have an equal chance of losing all of their money within a brief period.
Countries near Botswana

If you live or work in any of these countries, you may be interested in the information on binary options trading in these countries, too. Follow the link below to receive the information from us.
Botswana shares borders with several countries. These are:
Conclusion: Binary Options trading is available in Botswana
With 16 banks functioning there, Botswana’s banking sector is comparatively small yet well-developed. The assets of the four biggest banks make up about 75% of the total. The banking industry is profitable and well-capitalized, with a non-performing credit ratio of less than 5%.
All binary options broker businesses in the nation must be governed and supervised by the Bank of Botswana. To make absolutely sure the banks are well-run and sound, it has several powers and tools. When coming to options trading, since they are regulated by both BOB and other prominent financial regulatory bodies, your investment is in good hands.
When you can make nearly 95% of profits on your investment, you should be ready to risk that much. However, with caution and by investing wisely, you can reduce the risk of losing money and staying in profit.
(Risk Warning: Your capital can be at risk.)
Frequently Asked Questions (FAQs) about Binary Options in Botswana:
What are the important measures to protect your privacy as a trader?
Security precautions are essential in binary trading for the sake of your money’s security. Obviously, users like to deal with a binary broker who safeguards their personal information and gives them a sense of security. The aforementioned platforms take all necessary steps to ensure a high degree of safety for their traders. There are no concerns about the platform’s safety or your security as a user of it.
How to choose the best trading platform to trade binary options in Botswana?
The platform should function flawlessly and should be expertly designed. It should not have any glitches or lags when being used. The app must be available for apple iOS and android devices. The majority of brokers do not provide an iOS app, therefore is another significant aspect to check.
The app should function just as well as the web version. In conclusion, the flexibility of the broker’s trading platform should make it helpful for all traders.
Other information to look for in a trading platform is various periods, i.e., 5-second chart to daily chart options, free tools and indicators for analysis, various chart types, customizable and user-friendly, very quick trade execution, signals, competitions, and social trading.
Is it safe to trade binary options in Botswana?
Over the recent few decades, Botswana has advanced significantly while concentrating on good administration and economic development. The financial industry, which has undergone some policy initiatives over the years, is one of the primary areas that has been singled out for development.
All of the crucial economic sectors are well-regulated in Botswana’s financial system. The Botswana Financial Intelligence Agency (BFIA) is a significant government organization that works to prevent the funding of terrorism and money laundering in the nation.
The Bank of Botswana (BoB), the country’s central bank, tightly regulates and oversees the country’s financial industry. The BoB is in charge of overseeing financial institutions such as banks as well as preserving price stability.


